

In this guest blog post, Emerald shares the step-by-step process that she used to create a full bust adjustment alteration when making this version of the Meghan dress back in May 2020. Whether you are a C cup bra or above, or you are making for someone else, or you would simply like to add to your sewing skills, then this blog post is for you.
Grab a cup of tea and enjoy!!
******************************************************************************************
Why an FBA?
Patterns are traditionally drafted based on a woman who wears a B cup bra - that means if you wear a larger cup size, you will almost certainly find that clothes that fit your bust are too big on your shoulders, do weird things around the armholes, and gape at the back. A full bust adjustment lets you pick a size based on your shoulders and adds room in the bust so that you can get a proper fit in both areas!
Pick your size
Instead of taking one bust measurement, you are going to take two: your high bust and your full bust. High bust is a measurement under your armpits and higher than your boobs. Take your measurements in the type of bra you normally would wear with this type of garment, and pull the tape measure so it is snug but not tight - if the tape measure is cutting into you, your clothes will end up cutting into you too! Your high bust measurement is taken with the tape measure under your armpits, above your actual breasts. The full bust measurement is taken around - you guessed it - the fullest part of your bust. If there is more than two inches' difference between your high bust and your full bust, you might benefit from a full bust adjustment. I would strongly recommend making a toile to check the fit before using your best fabric - fitting is a process, after all!
Picking your size


Pick your size based on your high bust measurement - even if it looks like it won't fit. I strongly recommend tracing your pattern if you are going to make adjustments - that way if you make a mistake, you still have the original and can start over.
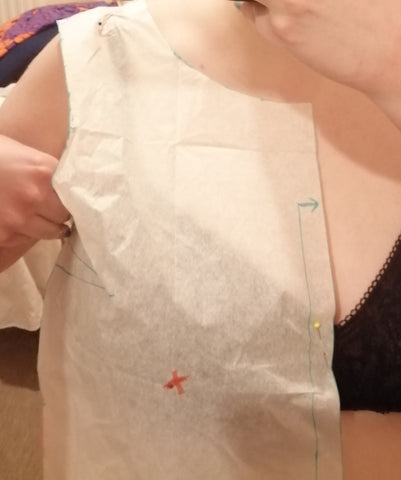
Mark your "apex"
You need the space in the pattern to be where your boobs are - so you need to mark the fullest point of your bust. "Try on" the pattern by pinning it to your bra, with the centre front in place. The side seam won't reach your side, but don't worry! Find and mark the apex with a pen - this is often around where your nipple is, but doesn't have to be.
Photo - FBA photo 1
If the dart is too high...
When I did this, I found that the dart was too high - darts should point towards but stop short of the apex you just marked. If this happens to you as well, it's easy to move the dart!
1. Draw a box around the dart (it's easier if you do it in a different colour).
2. Cut out the box
3. Slide it down the side seam a few inches so it's pointing at your apex and tape in place
4. Fill in the hole you left with some tracing paper.
Photo - FBA photo 2
Photo - FBA photo 3
How much do you need to add?
There are different ways to work this out. You can:
1. If the pattern you're using has finished garment measurements, look at the finished bust measurement for the size you've chosen and compare. Lets say the finished bust measurement is 42, but your bust measures 46. You will need to add in four inches to accommodate your bust, PLUS ease. I usually add 2" ease for my bust, if you like clothes to fit loose or the style of the garment is blousy/oversized, you might want to add more. In this case, we would need to add a total of 6" - but as an FBA adds to half the bodice, divide 6 by 2 - we need to add 3" with our FBA.
2. "Try on" the pattern piece, pinning the side seam and shoulder seam in place. Measure the distance from the pattern centre front to your actual centre front. That's how much to add!
3. Fudge it. I often add the difference between my high bust and my full bust, minus two inches to account for the original B cup drafting. This probably isn't the most reliable method, but it is the quickest.
The bust adjustment I used for my Dovetailed London Meghan dress is called a "Y" full bust adjustment - it's handy for if you need to add more than 3" total room for your bust.
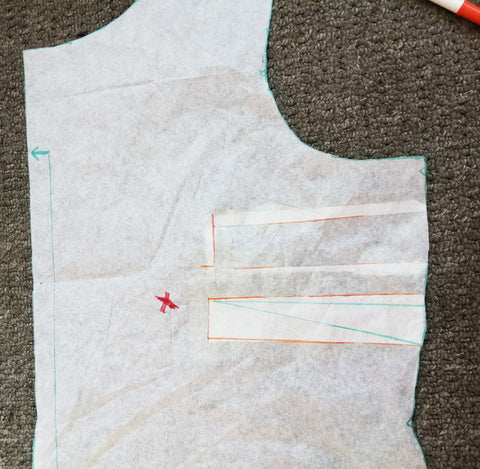
Draw in your lines for adjustment
You need to draw:
1. A line going through the centre of the dart to the apex
2. A line from the apex to somewhere about 1/3 the way up the armscye.
3. A line from the apex to the middle of the shoulder seam
4. A line from the apex straight down to the hem of the garment
Photo: FBA photo 4
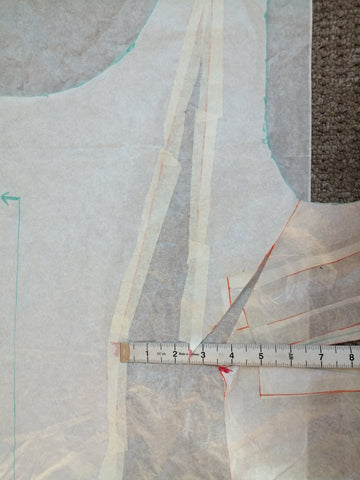
Cut and spread
Put a sheet of tissue paper under your pattern.
Cut up line 4, through the apex and through line 1 until about a cm before the shoulder seam. Then make a tiny snip from the other side of the shoulder seam so that there's a hinge of tissue paper holding the whole thing together. Do the same along line 2, again making a small hinge.
You will need to spread the tissue apart until the gap at the apex is HALF of the amount you have decided to add. For example, I added four inches to my pattern piece (to make for a FBA of eight inches total). In this part of the process, I spread the pattern two inches. When you've done that, stick the piece you have just cut above the apex. I recommend using masking tape for this! You can see even in my photo that I accidentally spread it more than two inches to start with - masking tape means you can still change it.
Photo: FBA photo 5
Photo: FBA photo 6
Check your shoulder seam
The last alteration may have made this seam a bit wonky - you can tape a little bit of tissue paper behind the seam and redraw the line so that it's straight.
Cut more, spread more
Now cut along line 3, again making a small hinge. Spread the rest of the distance - so in my case, another two inches. At this point, the dress will have splayed right out. Open up the dart to even everything out again, and stick everything down around the bust.
Redraw your dart
You'll need a ruler for this part! Line your rule up in a straight line from the point you marked for your apex and the middle of your new dart. Make a mark about 2" back from your apex. This will be the point of your new dart. Using the ruler, join up the new point with where the original dart legs started (another advantage of using masking tape is that you will be able to draw on it). Voilà!
Photo: FBA photo 7

Even up the hem
Your hem will be very wonky. Draw a line (along the lengthen/shorten line if there is one, otherwise just pick somewhere a few inches up from the hem) from the centre front to the cut you made along line 4. Cut along this line completely, and move this part of the dress down until the hem is even. Fill the gap in with tissue. Now is the time to stick down the rest of the bodice, filling all the gaps with tissue paper (I also managed to rip a little hole in my pattern at this point, as you can see...)
You should now take a minute to compare your new pattern piece to the original, e.g. do you need to add or take any width from the new side seams.
Photo: FBA photo 8

Voilà!
Here is your new pattern piece!
Written by Emerald
Comments
Hi Jo,
Thanks for your comment. I would make the side seam allowances a little bigger (1/4" to start with) more if needed. This will reduce the finished size at the side seams. At the same time, the arm hole will be made a little smaller. Making the shoulder seam allowances a little bigger (1/4" to start etc.,) will also have the effect of making the armhole smaller. I would do this rather than cut a size down especially if the fit is comfortable on the bust. The lengthening / shortening lines are positioned below the pocket marking lines so the position of the pockets will not need to be adjusted.
Thanks,
Adaku
I have made the Meghan dress in size 14 .it is comfortable around the bust but the side seams and armhole could be a little smaller. Would it be safer to go down a size? as I have never adjusted a pattern before.
Also if you shorten the dress where it indicates do the pockets need to be adjusted as well
Thank Jo Ward